Table of Contents
It is usually a good idea to regularly back up your computer. In the event of a virus attack, software malfunction, or hardware failure, you want to be confident that your data, documents, and images are safe. With Apple’s built-in Time Machine application, which allows you to back up your whole system and then restore certain files or the entire disk, this procedure is made simple for Mac users.

You have the option of initiating backups manually or automatically. Storage options for backups include network-attached storage (NAS) devices that support Time Machine via Server Message Block, external drives that connect via USB or Thunderbolt, and another Mac that is used as a Time Machine destination. You may configure Time Machine for any type of backup media as follows.
How to Start a Time Machine Backup
The method remains the same regardless of the macOS version you are using because Time Machine has not been altered in many years. The first setup procedure, however, will vary according to the backup media you use.
Configure Using an External Drive
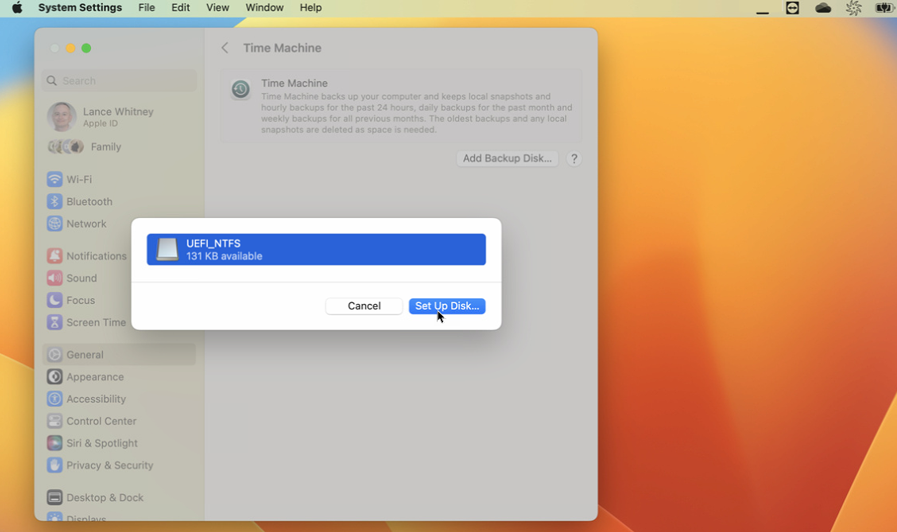
If it’s an external disk, connect it to your Mac and confirm that the desktop icon shows up. Click the Add Backup Disk option under System Settings > General > Time Machine on macOS Ventura or above.
Open System Preferences > Time Machine > Select Backup Disk in previous versions of macOS. After choosing the device, click Use Disk.
It asks you to erase the disk first if it hasn’t been formatted to work with Time Machine and the Mac. The drive is then prepared after this.
Set Up with Another Mac
It is necessary to make a shared folder on the other Mac in order to utilize it as the backup destination. Apple can assist you in setting up File Sharing and converting a folder to work with Time Machine.
Next, you link the two Macs by selecting the destination Mac under Network and double-clicking it in Finder on the Mac you want to backup. Click Connect after entering the target Mac’s username and password. The shared folders on that Mac, together with the backup folder you created, ought to then be visible to you.
Open System Settings > General > Time Machine (System Preferences \ Time Machine in previous OSes) from the Mac you are using for backup. Select the backup share on the destination Mac after clicking Set Up Disk. To access your destination Mac’s login and password, click Use Disk.
Set Up with Network Storage
Because Time Machine is limited to specific volume types, backing up to a NAS device might be challenging. If you have a Synology NAS, you can use Time Machine with it and find instructions on using your NAS for backups on their support website. You might need to get in touch with the manufacturer to find out more about the device’s Time Machine compatibility if you have any other network storage choices.
If you can access your network storage, open the Time Machine options on the Mac you wish to backup. Select the backup share on your network device by clicking Select Disk. Subsequently, Time Machine prompts you to provide a username and password for your network share
Setting Up Manual and Automatic Time Machine Backups
The backups are scheduled to run automatically by default. Time Machine maintains hourly backups for twenty-four hours, daily backups for a month, weekly backups for the last twelve months, and local backups dependent on available disk space. When the space on your backup media becomes limited, the oldest backups begin to be erased.
Click the Options button in the Time Machines settings menu if you wish to stop the backups from starting on their own. Click the drop-down option next to “Back up frequency” and select “Manually.”

You can also select which folders to exclude from the backup and select whether or not to backup your Mac when it’s running on battery power while in this section.
Select the Time Machine menu bar icon and choose Back Up Now to carry out a manual backup. After that, a background backup of your system is created. You can now view the status of the backup by selecting the Time Machine symbol in the menu bar.
When the backup is finished, a notification will show up on the screen.
By choosing Stop This Backup, you may end the backup. Remember that a backup to a linked disk will complete considerably faster than a backup across a network. Apple can assist you if the backup takes longer than anticipated.
How to Restore Individual Files
Click the Time Machine icon in the menu bar and choose Browse Time Machine Backups to recover a single file or several files from a backup. Several cascading windows appear, each directing the user to a separate backup.
When the backup was taken will be indicated on a label to the right of the window. The files you require can be found in a previous backup by using the up and down arrows. To restore the data to their original position after locating the proper backup, choose the folder containing the files you want to restore and click the Restore button.
How to Restore a System Backup
Connect your Time Machine disk to your Mac in to restore your whole system from a backup. Verify that your Mac is connected to the same network if the backup is located on a network share. The next step in the factory reset procedure is to reinstall macOS.
You may use the Migration Assistant to move your current data after the operating system has been restored. Select From a Mac, Time Machine backup, or Startup disk from the menu, then click Next.
Next, choose the media you want to use for your Time Machine backup and press Ok. Click Continue after confirming the transfer of the data and deselecting any material you do not wish to be restored. After creating your account’s password, click Continue. After that, the data from your backup is moved and restored.
When the migration is finished, you will receive a notification. After selecting Done, log back into your Mac to complete the setup.


